Showing posts with label Recipes. Show all posts

February 06, 2014

Homemade Papaya Seed Peppercorns

 I've been trying to come across interesting health tricks to help change my eating habits in small and big ways. This one was something that really stood out for me.

Did you know you can make your own form of pepper by drying out Papaya seeds? And they are crazy potent. It helps your digestive system by helping you break down undigested food and helps normalize your intestinal tract. They can aid by killing parasites and bacterial infections, and even help with liver detoxification or Cirrhosis of the liver. They have so many health benefits. In fact they're more like a drug in terms of their medicinal value. How cool is that? That being said, you should carefully research it to make sure it's right for you. It should only be used in smaller amounts and is not good for children and pregnant women. So weird to think, right? The fruit itself has amazing benefits as well, but the seeds are highly concentrated.

Have you ever eaten the seeds? It tastes a lot like eating pepper. They're coated with a jelly-like outer shell and inside they're hard, almost like a pomegranate seed. It's spicy and strange and a lot of people don't like eating straight Papaya seeds. I know I don't. I found many articles about drying out the seeds and grinding them down to use as pepper in your cooking, so I thought I'd give it a try.

Firstly you have to separate the seeds from the fruit. I scooped them out and placed them in a large strainer under the sink. I washed away the bits of fruit and separated large pieces with my hands. I noticed the seeds come away really easy. You barely have to do anything, which is nice considering prep work with other types of seeds that have a lot of fibrous meat to them. 

Once you have most of it off, pour your seeds into the middle of a dish towel. I did this part over top of a cookie sheet to make sure I didn't spill any. Gently rub them in the dishtowel to both dry them and also transfer off the rest of the fruit that's still hanging onto the seeds. This part was again, really easy and the seeds are very tough, so they didn't burst or break open in the process. 

I lined my cookie sheet with dry paper towel and spread the seeds out on top of it. 
Now it's time to wait! 

I have left my seeds for a week and a half now, checking on them periodically to see how they're coming along. They dried out so much faster that I originally imagined. Of course it will completely depend on your own home; It's temperature and how much moisture is in the air. I will probably leave mine until the two week mark. They should look matte and not have any shininess to them. 
Here are mine right now:
Big difference between before and after, huh? 
When they're dry you can put them in a pepper grinder and use them in any way you would use normal pepper. I can't wait to try it!


I hope you found this as interesting as I do! It's certainly a weird idea, but completely worth a try given the Papaya's track record. 


Marissa xo


October 09, 2013

Orange Raspberry Bread

When I was young, my family was always baking. There was never a shortage of sweet treats around. My mom was always making cinnamon buns and shortbread cookies, and my grandma would make anything and everything from tarts to pies. Not just a normal amount, but enough to feed her entire family for weeks. That meant we always got  tupperware containers or vintage tins filled with goodies to take home. One of my greatest memories is waiting for my grandma's christmas desserts to thaw from our basement freezer. The only way we could eat them all was to freeze them. 
One of my favourite things to have from childhood was their loaves. I always loved having a warm piece smeared with lots of butter. Yum. And now that I have my own kitchen, I'm really drawn to making them for my own mini family. There's really nothing like a hot fruit loaf straight out of the oven. 
This is something I whipped up myself that we really enjoyed. It reminded me of when I was young, hence the introduction about my family and their baking addiction. It felt like my grandma or mom had made it for me with love, and that made the recipe even more special and delicious. There was something about the way the orange and raspberry blend together, that almost crystallizes and forms it's own glaze. Its tart, sweet, and I can honestly say one of the best things I've made in a while.You have to try it!

Here's what you need:

* 1/2 cup butter
* 1/2 cup milk
* 1 cup sugar
* 2 eggs
* 1 1/2 cups flour
* 2 tsp orange zest
* 1 tsp baking powder
* 1/2 tsp salt
* 1/4 orange juice (fresh squeezed)
* 2 cups raspberries

What you do:

Preheat your oven to 350 degrees C. Mix the butter and sugar in a bowl until it's light and fluffy. Then add the rest of your ingredients (except the raspberries) and mix the batter until smooth. Leave the raspberries until last so they stay whole. Grease a loaf pan, and pour the batter into it. Let the loaf bake for one hour, checking it periodically. After one hour, check with a toothpick to see if it's cooked all through. If not, an extra 15-30 mins baking can be tagged on to this time. (It will depend on the thickness of your loaf pan and also your oven temperature, but it will not take less than one hour.)
Once it's done, take it out and let it cool. I prefer to eat mine right away while it's still warm from the oven. As much as I love Fall foods, I needed a boost of something more energetic and lively. Fall is making me too cozy! Enjoy!


Marissa xo

June 18, 2013

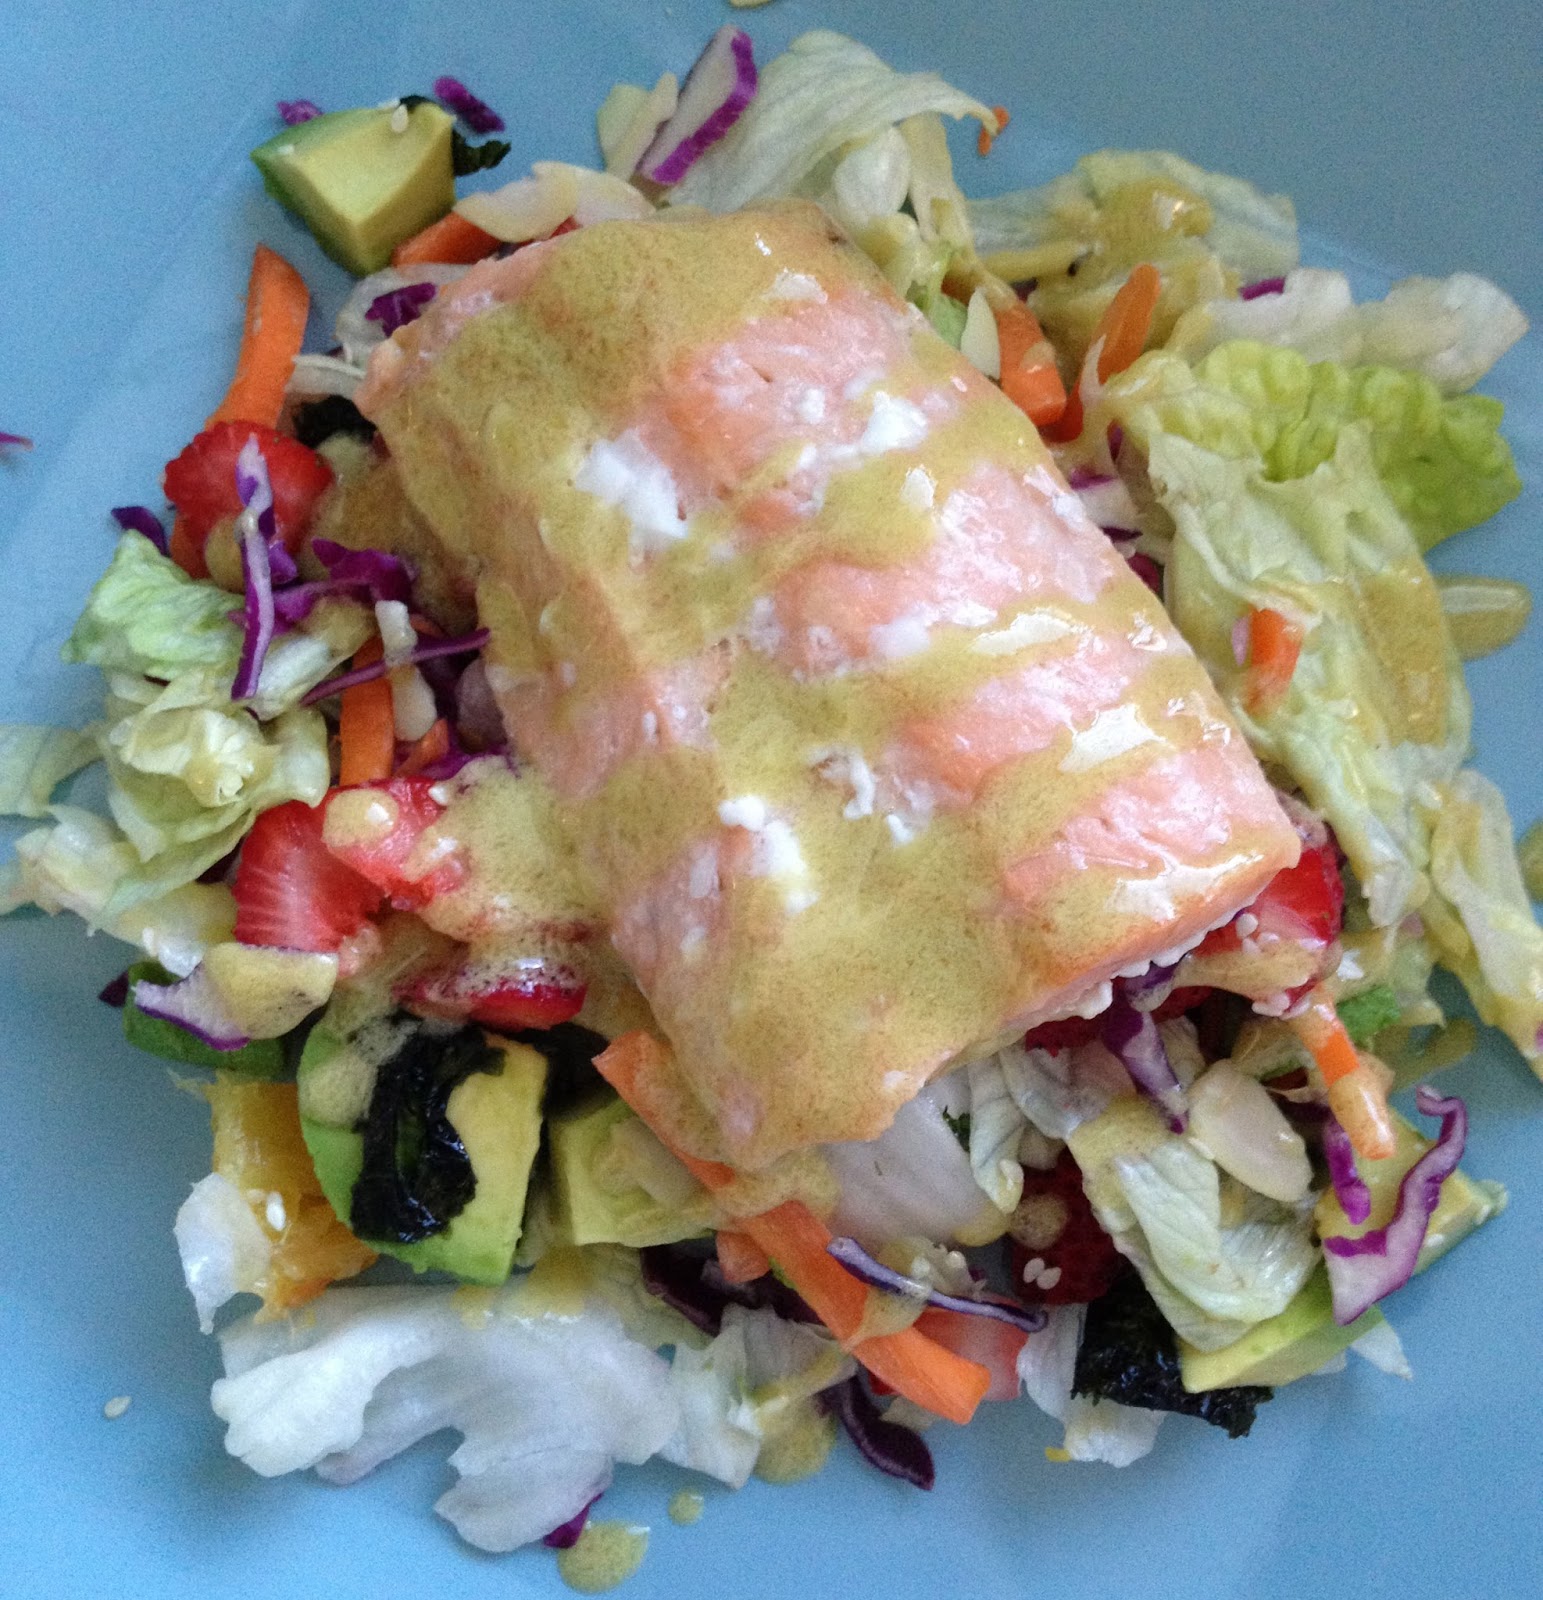
Summer Sushi Salad with Wasabi Dressing Recipe

This is one of the easiest gourmet-style salad recipes that I make almost once a week, or at least some form of it depending on what ingredients I have laying around. Last night was just one of those busy nights where we needed a quick dinner with a lot of flavour to boost our mood and keep us going for the rest of the evening. My boyfriend's working so hard on his comic and I'm pricing garage sale items (There sure is a lot of stuff to go through. Yikes.) He said after a long day at work, that was exactly the kind of dinner he wanted to come home to. Seriously, you have to try this salad out for yourself. 
Here's how to make it!

Salad Ingredients:

(This is how I made it this time, but I always change it up depending on what I have in the fridge! 
Get creative with it!)

*bag of salad
(mine was a mix with iceberg, cabbage and carrots, but I like using romaine for this recipe.)
*1 orange
*4 strawberries
*1 avocado
*nori/seaweed
*a handful of sliced almonds
*sprinkle of sesame seeds
*salmon

Dressing Ingredients:

*1/2 cup oil
*2 tbsp wasabi powder 
*water
*2 tsp lemon juice
*1 tsp sriracha
*salt
So as you can tell from the name, this salad has Asian influences, and has similar ingredients to Sushi, but for this recipe I added a lot more fruit than I usually do. Sometimes I just add dried cranberries to give it some sweetness. If you want more of an Asian flair, adding pieces of crab or pollock (fake crab) is really good in this salad too.)

First of all, preheat your oven at 350 degrees F. Then stick your salmon in a baking pan for around 30 minutes, but keep checking it to make sure you don't overcook it. I cooked mine from frozen. If yours isn't frozen, it won't take very long at all. Maybe 15 minutes or less, so keep your eye on it. Before I put my salmon in, I always sprinkle it with a bit of oil and lemon juice, but plain is just as good!

Now while that's going you can work on the salad. If you bought a bag of salad like me, just give it a wash and put it in your bowl. Cut up your orange, avocado and strawberries and add your almond slices and sesame seeds. You can crush up your nori or slice it with scissors. There. Your salad is all done! It's time to move on to the dressing. 

Now I never actually measure my dressing. I actually just go by taste, and keep adding to my liking. You may want to put less wasabi or sriracha, because it does give quite a kick. At my house we are in love with spicy food, but if you like yours a little more tame, just add less. I put my approximate measures of each ingredient above in the ingredient list, so start with that and add more or less depending on how you feel about spicy things. But let me tell you, this salad is nothing without the wasabi dressing, so you have to try it! Don't wimp out now! I can see you hesitating and wondering if you should substitute it for something else. Don't! If you like sushi, you'll like this.

Okay, let's get mixing now! First we have to mix the wasabi powder with a tiny bit of water. If you just bought the premade wasabi in the tube, lucky you. You can skip this step. Put your powder in a little bowl and add a tiny bit of water. It's better to have less than too much. You want to mix it and get a thick paste. If it's watery, you put too much! Now add the rest of your ingredients and give it a taste. 
Add more of whatever you like until it's exactly to your liking. If it's too thick of a dressing, add a bit more oil to thin it out. Is it spicy? Yeah! Good! That's what you want! Let's get that salmon out of the oven.
Assemble your summer sushi salad however you like, and enjoy!
This is by far one of our favourite meals to have. I could eat this every day and never get sick of it.
The best part is, it's very light and doesn't leave you feeling stuffed and uncomfortable. It's a perfect summer picnic recipe.

Try it for dinner tonight!


Marissa xo
CharmingShop


June 09, 2013

Salad Rolls with Peanut Dipping Sauce Recipe

Yesterday I got some time to sneak on here and tell you what I've been up to this fine weekend. Well it's Sunday and as I said yesterday, it's time for a yummy salad/summer roll recipe. The names are interchangeable really. Whatever you want to call them - salad roll or summer roll. It's up to you, my dears! I guess I'm just used to saying salad roll. You can make these amazing rolls with anything inside. There's no set rule, and I think creating your own personal version is cool, don't you? You could even put fruit, like mango in here and it would taste amazing! I used chicken, but you can stick some shrimp in there instead. If you're vegetarian, maybe add some tofu. The nicest part about this recipe (and probably why I love it so much) is that it's gluten free. All you lovely people out there, like me that can't have gluten, can enjoy these too. Just make sure you get gluten free soy sauce! Okay let's get on with the good stuff. I bet you're ready for some food photos! I have a fear I'm going to have a craving for these again after this post is done...
Ingredients for the Salad Rolls

(Prepping is so important for this recipe. It takes a while to get everything prepped and ready for making, so keep that in mind if you are making them for a party!)

*julienned carrots
*julienned cucumber
*baked chicken cut into small strips
*vermicelli (rice) noodles
*rice paper wraps
*fresh cilantro
*lettuce (I used a Mediterranean blend for more flavour.)

That's it!

Ingredients for the Peanut Dipping Sauce

*3/4 cup peanut butter (I used crunchy. I love the extra texture!)
*1/3 cup water
*2 tbsp lime juice
*4 1/2 tsp soy sauce
*1 tbsp sugar
*2 1/4 tsp Sriracha
*1 garlic clove, minced into tiny pieces
*1/2 tsp sesame oil

You can make the sauce ahead of time and refrigerate it. Just take it out a while before serving, because it should be at room temperature for eating. Yummy! The taste of that sauce is incredible!

Okay, we're ready to start making the rolls!
Let's start preparing those veggies and the chicken. Preheat your oven and get your chicken in there
to bake while you're slicing away at your carrots and cucumbers. I put about three carrots and three cucumber pieces in each roll. You can add more or less, but use this as your guideline for how many you need to cut. Julienne both the carrots and the cucumber. They should be cut lengthwise and thin! Don't cut your fingers if you're cutting them by hand! Go slow and take your time.
Start boiling a pot of water for the vermicelli noodles. They cook fast, so you need to keep an eye on them at all times while cooking! Once the water is boiling, stick in your vermicelli and reduce the heat a bit. They should be soft in just a few minutes. Drain and put into a bowl. Don't worry about them not being hot anymore if they sit out. This is meant to be a cold dish. Also, if you're worried about your noodles sticking together too much, you can add a tiny amount of oil to the vermicelli.
Wash and pick the leaves off your cilantro. Next prepare your lettuce.

Okay now your chicken is cooked and sliced, and you're ready to start making your rolls!
This is the fun part! Open up your rice paper wrap package and have them out ready to go. Boil some water in a pan. Not too hot because you will need to gently cook the wraps and be able to get them out of the water without burning your fingers. What I do is let the water in the pan start to bubble, then I turn the element off and wait a couple minutes for the water to cool down enough that I can get "hands on" with my rice paper. If you're unsure about this step, you can also boil water in your kettle and then pour it into a pan. Just make sure you test the water! For this step you will need a fork and a plate to roll your salad rolls on. Now when you have your water at a good temperature, take a wrap and submerge it in the water. I like to hold a fork gently underneath one edge to help me lift it out. It will only take seconds for your rice wrap to become soft. If you've never done this before, it's okay. It's kind of like trial and error in the beginning. You'll find the balance right away. If it's too soft, the paper will break. If it's too hard, you won't be able to roll it up.
Okay, do you have your system down? Great! Now once you get your paper on the plate and you've spread it out a bit (Sometimes the edges like to stick together.) you can start putting on your ingredients. Near one edge (but not directly on) add your noodles, all your veggies and chicken. Now gently fold the edges in and start rolling back. Now you've got one roll. Wow, you're a pro. Are you sure you haven't done this before?
Keep repeating until you have your desired amount of salad rolls.
You may have to heat up your water in the pan again if the water cools down. I find it's easier to make a whole lot of these rather than just a couple. If you're done and you find you have left over ingredients, have a stir fry tomorrow! Or a salad!
Now for that yummy peanut sauce. It's super easy, mix all your ingredients in a bowl. It's easiest to use a spatula to whip it all up. It should be thick and creamy. Give it a taste. Awesome, right?! Yes! There you have it. Some party perfect salad rolls with peanut dipping sauce just in time for summer. Oh how I wish we could've eaten these outside in our backyard. I got the patio table and chairs out and washed them down. It was so hot out, and then suddenly the weather was awful. Oh well, at least we got to eat these! I hope you'll try these out and love them as much as we do. Be adventurous and add your own ingredients. Let me know how yours turned out!

Enjoy your Sunday, dolls!
I'm having my mom over for dinner, so I better go get ready!


Love,

Marissa xo
CharmingShop


P.S. Have you seen the sneak peek at my new collection on Instagram? Go to @marissahowes to find me and take a look, say hi or follow me there!


May 27, 2013

Simple Banana Bread Recipe

Here is a very simple Banana Bread Recipe to brighten your day. The weather has been a little gloomy lately. Grey skies, a little rain here and there. The leaves are appearing on all the trees, the grass is as green as could be, but we're all wondering when the warm weather is coming. I've been spending most of my time inside in big winter sweaters, wrapped up in blankets. When is the cold going to end? I had a serious craving for something baked straight out of the oven, and there were a few bananas around that were too brown to eat now. So I thought I'd make some warm and tasty banana bread!

This recipe is so easy to make. It only took about five minutes to prepare and an hour to cook. Simple as that. No fuss.  
Ingredients:
*3 bananas 
*1 1/2 cups flour
*1 cup sugar
*1/3 cup butter (melt in microwave)
*1 egg
*1 tsp vanilla
*1 tsp baking soda
* pinch of salt
Okay, this is super simple! First preheat your oven to 350 degrees F. Get out a mixing bowl and mash your bananas in it until fairly smooth. Next add your melted butter and mix. Then mix in your sugar, egg, and vanilla extract. After that you can add your salt and baking soda and mix. If you're feeling adventurous add a bit of cinnamon in there too! Lastly, add your flour. Once that is all mixed together, pour your mixture into a loaf pan. Bake for exactly one hour and it comes out perfect! 
You could actually use this recipe to make muffins or even bake it in a cake pan and ice it for a really nice cake! Let your banana bread cool for a while. Then put it onto a platter and slice it up. My loaf pan has a pretty design on the bottom of it, so I flip my banana bread upside down when I take it out so the design shows. How cute! It should still be hot enough that it tastes fresh and delicious. You won't want to stop eating it! 
You can eat it plain or add some butter or margarine. I love mine with a hot cup of tea.

Yum!

Happy banana bread-making!


Marissa xo
CharmingShop

May 01, 2013

Pesto Pasta Recipe

Hello!
Okay everyone, if you haven't tried any of my recipes yet, you have to try this one. The other day I had a ridiculous amount of cilantro left over from a dinner party. I bought it for a cheese platter. I cut and hand pressed cilantro and green onion into goat cheese, and it was yummy! The problem is, you only need a small amount, and by the time I was finished making the cheese platter I still had almost all my cilantro left. Oh no.

So I figured out a solution. A homemade pesto. This is possibly the best thing ever. it tasted so fresh and garlicky (yeah be careful! There's a whole lot of garlic in here. In fact you may want to cut it down a bit in the recipe if you're not a garlic fan.) It felt like I was out eating at a restaurant, and that's pretty nice. 
Here's what you need:

*2 cups cilantro
*1 cup parmesan cheese
*1/2 cup oil
*1 tbsp lemon juice
*1/2 cup crushed almonds (sliced almonds)
*2 stalks of green onion, chopped
*2 garlic cloves, chopped
*desired pasta
Here's what you do:

First we're going to make the pesto. Grab a cutting board and knife and let's get started. First pull the leaves off your cilantro. We don't want stems here. Once that's done, bunch them all together and chop them with your knife. It's okay if it's not perfect. This Pesto is not made with a food processor or blender. It's a more natural, chunky take on Pesto. Now put them into a bowl to be mixed with your other ingredients. Now finely chop your green onion and garlic and add those to the bowl as well.
Next we can do the almonds. I have sliced almonds here, because they're easier to work with, but you can chop up whole almonds too. Put your sliced almonds in a Ziploc bag. Close it up. And now smash them up with a spoon (or your hand.) Once the pieces are crushed up, add them to the bowl too. Next add the rest of your pesto ingredients - parmesan cheese, oil and lemon juice.
Alright, that's done. Just mix that all up and taste. If it's not to your liking, adjust to your tastes. 
But I promise you, it tastes amazing! You'll like it.
Lastly, cook your pasta and drain. Once it's ready, add your pesto on top and serve.
Best dinner ever.


Marissa xo
CharmingShop

April 27, 2013

Miso Soup Recipe

Hello! I decided to try my hand at making some Miso Soup. Now let me just say it's not your traditional miso soup; it's a twist. I just needed something simple and easy to make with just a few key ingredients. And truth be told, it's pretty tasty, so I hope you give it a try!
 Ingredients:

*4 cups water
*3 tbs miso bean paste
*1 cup diced tofu
*2 chopped green onions
*1/2 cup cut seaweed

Note: I buy sushi roll sheets of seaweed and cut them into small pieces with kitchen scissors.
I think I used about 3/4 of a sheet for this recipe.
also
Prep beforehand. Chop up all your ingredients before you start cooking to make it easier.

What To Do:
Bring your water to a boil in a pot on the stove. Then reduce your heat to medium and add in the miso bean paste. Stir it into the water to mix well. Now add in your tofu and green onion. Let that cook for about five minutes, and then add in your seaweed. Next let your soup cook for 10 to 15 minutes. 
 This recipe is so easy and fast! You could be having homemade soup in about half an hour - prep and cooking time included. That's pretty awesome if you ask me! It's so great for a nice warm lunch or even as part of your dinner. First course anyone?
I hope this inspires you to try some new soup making techniques! I'm all for chunky vegetable soups but it takes forever to cut all your different ingredients. This was too easy.
 I think my miso soup will be a regular meal in our house from now own. 

Thanks for reading!


Marissa xo
CharmingShop


April 22, 2013

Brussel Sprouts with Homemade Tomato Sauce

Hey lovelies, I've been off for a few days, letting the comic book artist in the family work on his colouring... I've been dying to write some new posts. So first of all I wanted to share a new recipe with you! I have been really inspired by raw cooking. I've been reading up on it lately and I'm really interested on how it works. For those of you that don't know, I will put it into simple terms, eating raw means you don't cook anything. For added texture items can be dehydrated, but not cooked. The diet is mainly vegetable and nut based. It's so interesting and even if you're not going there with your meal plans, you should do some research because it's pretty cool.

Brussel Sprouts with Homemade Tomato Sauce
This dish is by no means a fully raw dish. It's only raw inspired. I cooked two items in here. I'm trying to get my diet back on track! There always seems to be a holiday or party where we have to celebrate and a lot of food ends up being eaten. I'm taking my health back. 
This recipe was made just for me! Double it up for two people.

Ingredients
1/2 large tomato (or 1 small)
1/2 cup red pepper
1/3 cup onion
8 brussel sprouts
3 pieces of marinated artichoke
2 tsp oregano or to taste
cheese of your choice

Alright so first of all cut your brussel sprouts in half and place them in a steamer, ready to go. Next chop up your tomato, red pepper and onion into little pieces. You can mix the tomato and onion. Keep the red pepper separate, because we will be sticking them in the oven. 
Now cut up your artichokes. They come in a jar almost like pickled items, but they are marinated in spices and oil. Yummy. Chop those into small pieces as well just to add a bit of flavour to the dish. Add that into your tomatoes and onion. Now mix in your oregano. Let that all sit together while the brussel sprouts are steaming. 
Keep checking your brussel sprouts while they steam. They wont need very long, especially since they've been cut in half. They should turn a pretty, bright shade of green. 
While your brussel sprouts are still in the steamer, your chopped red pepper will need to go in the oven, to be sweetened. Put them on a pan covered with oil. Stick them in there at 350 degrees F. They should only need about five to eight minutes, but watch them carefully so they don't burn. 
When everything is done, turn off your steamer and put the brussel sprouts in a dish. Turn off your oven and mix the red pepper with the tomato mixture. Now pour the contents of that bowl onto the plate of brussel sprouts like a thick, chunky, clean sauce. Now grate your cheese over top with your desired amount.
Now it's ready to eat!
I really enjoyed this recipe. It was simple to make, and it tasted really hearty with the brussel sprouts, but still light and fresh. I don't think I could ever pull off a completely raw diet. I love to cook too much. But if I can incorporate a dish here and there that's inspired by a clean raw diet to help my body out once in a while, that's great!  
 Thanks for reading!


Marissa
CharmingShop


April 16, 2013

Carrot Cake Recipe

Hello everybody! Today I want to share a recipe with you. This is a carrot cake recipe I made on Sunday that was probably the best carrot cake I have ever eaten in my life. I have never made carrot cake from scratch before. I will admit I do use a packaged mix. Who has the time?! However I was just itching to do something new, so I got out my ingredients and got to it. Here is the admittedly pretty easy carrot cake recipe:
Ingredients:

*2 cups flour
*2 cups sugar
*2 tsp baking soda
*1 tsp cinnamon
*1 tsp salt
*4 eggs
*1 and 1/2 cups vegetable oil
*3 cups grated carrots

Instructions:

Alright I'm going to recommend starting with the carrots first.
I used a vegetable peeler to peel about 4 carrots(mine were on the smallish side.)
Then you can put the peeled pieces in the food processor or blender until they're chopped into little bits.
Preheat your oven to 350 degrees F.
Get out two cake pans. I greased mine with a very thin layer of butter.
In a large bowl, mix your dry ingredients - flour, sugar, cinnamon and salt.
Now add your eggs, vegetable oil and grated carrots and mix until it forms a nice thick batter.
Put your mix into the cake pans and then they can go straight into the oven for 30 mins.
I ended up leaving mine in for 40 minutes because my oven isn't as strong. Just make sure you check to see if they're done at 30 mins.
 A Good Trick:
This is a fabulous bakers tip that I use on everything! Stick a toothpick inside the middle of your baking. If it comes out clean, it's done. If it has traces of batter, it needs to go in for longer. But always be cautious and watch the oven like a hawk when you put something in for longer than the recommended time.

So it's been 30 minutes and it's time to take your cakes out of the oven! Hooray!
Wear your oven mitts and get those babies out of there. Now leave them on the top of the stove to cool.

This cake is so moist and insanely delicious, you really don't need an icing. Because I was taking it to a dinner party, I made one. Just my usual icing complemented this cake nicely. Don't try to ice your cake when it's hot or even slightly warm. the icing will melt and slide right off. Room temperature is best. Probably an hour or two after baking is safe.
Icing:
Here's my Icing Recipe again for a refresher. It's really good icing for this. For some reason it just meshes well. If you'd like a more detailed icing instruction, look for my Easter Cupcake recipe here.

*1 cup butter (soft)
*3 and 1/2 cups icing sugar
*1 tsp milk
*1 tsp vanilla
*1/8 tsp salt

Let me know if you try this out, because I thought it was so yummy!! 
Have a great day


Marissa xo
CharmingShop

March 30, 2013

Easter

Hi everyone! I hope you're having a fabulous Spring Break. I've been spending mine mostly in the kitchen. I think I've caught the Spring Cleaning bug, because all I want to do is cook and organize and think about home renovations! It's crazy to think in a couple months we will have had our house for a year! There's still so much to do. Tonight is our family Easter dinner. I made these cupcakes for dessert!


I made 21 cupcakes. The others are in a huge Tupperware container, so I thought these guys would be easier to photograph. I love making things from scratch, because then you know exactly what's going into them. Sometimes though, there isn't enough time in the day! You know what I mean. So this cupcake batter is a rainbow bit cupcake mix from Betty Crocker. The icing is from scratch though!

Cupcake Icing:

1 cup butter (soft)
3 and 1/2 cups icing sugar
1 tsp milk
1 tsp vanilla
1/8 tsp salt

First mix the butter, icing sugar and salt in a bowl. Then add in the wet ingredients - milk and vanilla. 
You do need to work at it for a while until the mixture becomes creamy. It takes a little time.
Add in the food colouring of your choice! 


It makes a lot of icing. I was able to ice all my cupcakes without making a second batch. I just split my mixture into two bowls, so I could make both green and lilac icing! This recipe is quite sweet too, just a warning!


I covered everything with sprinkles. I just wanted my cupcakes to be super sweet and colourful.
I think my family will love them!

Have a great day you guys!

Marissa xo
CharmingShop


March 27, 2013

Easter Egg Hunt

Hi everyone! Yesterday I played around with eggs! Easter is coming soon. I love Easter. When I was younger I loved it because Easter is so close to my birthday, we used to celebrate my birthday and Easter on the same day. Now it's just all about the season for me. I love the pastel colours and the spring flowers. It just feels like a time of regrowth and renewal to me. Everything smells fresh and clean.


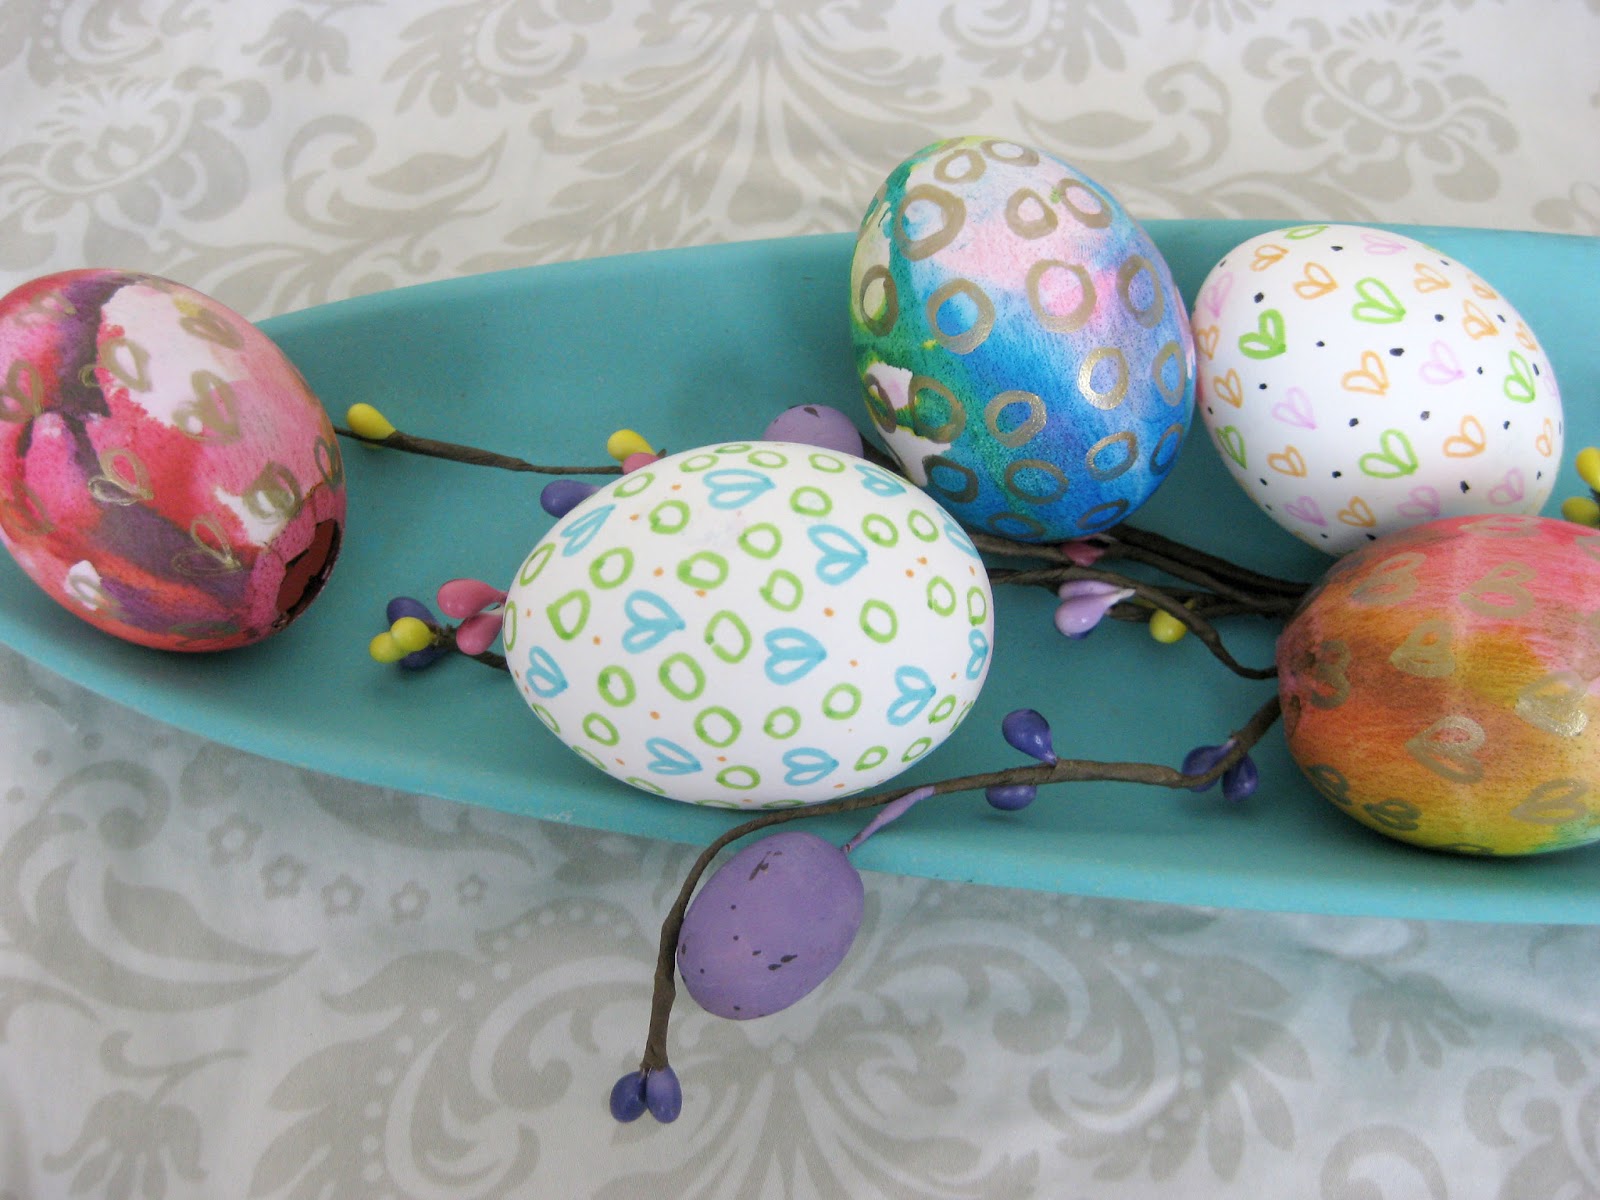
I couldn't let Easter pass by without decorating some Easter Eggs and this year I took a more kitschy, homemade approach. So I hope you like my Easter Egg Decorating Tutorial/DIY plus some cute display options.

This is what you'll need:

- eggs (I used seven. Plan to eat a lot of eggs that day, so they don't go to waste! We just need the shell!)
- knife and chopstick (This is what we used but you need anything with a point that can pierce the egg and then something to get the egg out of it's shell.)
- bowl (to empty raw eggs into.)
- food colouring (I used four. Mine are Neon style - blue, pink, green, and purple. But any kind will do.)
- small bowl of water (You will need to change the water for each egg.)
- markers (regular sharpies work well.)
- metallic gold marker 
- gloves 
- paper towel
- cake pan (or anything you can stand the eggs up in that can't get stained.)


 Prep:

Okay I hope you planned a day full of cooking and baking with eggs! We had lots of scrambled eggs and I baked cookies too!

Find the base of your egg (the bigger end.) This is where we will poke the hole. You can use whatever you want to pierce your egg. We just had a little pointed knife. (I say we because my boyfriend helped me out here!) Gently chip away and make a hole. You want to make a hole big enough for the egg to come out, but not too big that's it's very noticeable. About a cm will do. 

Now use a pointed object (we used a chopstick) to coax the egg out of the shell and into a bowl. Take your time so the egg does not break. Just let it drip out.

Clean your eggs. Rinse them out with water. You can also use a bit of soap. There shouldn't be any residue left in there. 

Now rest them on a paper towel. 

Food Colouring Time!: 

Fill your bowl with warm water.
Put on your gloves!

Add a couple drops of food coloring (one of each colour you want to use.)
Now dip in your egg and lift out. It will look like a light wash of colour. 
Holding your egg over the bowl, drip food colouring on top of your eggand turn your egg around and around slowly. This will help the food colouring spread around the egg better.

Once it looks the way you want to, place it down in your cake pan sitting up. Because of the hole in the bottom it should stand up on it's own. If some don't just lean it carefully on the edge of the pan.
Rinse out your water and keep repeating these steps with all your eggs. I did four this way.
Once they're finished and all in the pan, leave them for a few hours to dry.


Decorating with Markers:

You've waited and your eggs are now dry. Take then out of the pan one at a time and gently pat the bottoms with a paper towel to make sure they're dry. This part needs to be done very slowly. You need to keep paper towel with you to wipe your fingers, because if they get wet at all the marker and watercolour dip dye you did will start rubbing off and melting off your egg! I found it was best to pick up an egg and colour it while only holding onto the bottom of the egg. It's tricky, but it will keep things from smudging. 

Take the markers of your choosing and create cute springtime designs in keeping with the colours of your dyed eggs. I coloured three eggs and used a gold marker to go over my watercolour eggs. It really adds some dimension!

Now let your eggs rest for a bit to let the marker dry.

Display Your Eggs!:

What will you do with your eggs? Are you keeping them for yourself? Are you giving them away? How will you display them at your house?

We're keeping the eggs in our house until Saturday when we go to my moms for Easter dinner. Then they will go over there with us! Until then they are looking so pretty in our living room.

This is what we did:


This is a shelf in our living room TV unit. As you can see, we have a very unique way of decorating at our house. Wai (my boyfriend) enjoys comics and vinyl toys. I love girly vintage things. We make it work. 

Want a more modern option? I set this up for you guys too. Just to show a more modern take on Easter decorating. I really like them both ways!  


Have a great day!

Marissa xo
CharmingShop


March 26, 2013

Cranberry and Chocolate Chip Oatmeal Cookie Recipe


Today's diy is of the kitchen variety. Baking to be exact. I really love cooking. I'm not so much into baking, but it seems like I've been doing a lot of it lately. A while ago I made these AMAZING cookies, and ever since then I could not stop thinking about them. They have a lot of ingredients and I like it that way. All the different flavours are what make them so good. But hey, if you have any allergies or you don't like my choices, feel free to make your substitutions. 


Here's what you'll need:

* 1 cup butter
* 1 cup brown sugar
 * 1/2 cup sugar
 * 2 eggs
* 2 tsp vanilla
* 1 and 1/4 cups flour
* 1/2 tsp salt
* 1/2 tsp baking soda
 * 2 cups oats
* 1 cup dried cranberries
* 1 cup semisweet chocolate chips
* cashews for tops of cookies 
*ungreased baking sheet
 

The baking soda isn't in these pictures! So make sure you don't leave it out!
Got all that? Okay then let's get started!

First Preheat your oven to 325 degrees F.
I always leave my butter out (in it's wrapper!) overnight so it's nice and soft.
Cream together your butter, brown sugar and white sugar until it's completely smooth. (Today I only had white sugar, so I just put in 1 and 1/2 cups of white sugar. Trust me though, the brown sugar is totally worth it.) Beat in eggs one at a time. Once that's all mixed together, add your vanilla extract.
Next combine the flour, baking soda and salt. Make sure you've mixed this really well because next it's the dry ingredients, but you also don't want to overdo it either because this can change the way the cookies bake. So get it to the right consistency and stop. 
Good job!


Mix in your oats one cup at a time. 
Don't put them in all at once, because it can be too tough to stir it by hand. 
But look at it this way, you're building your muscles. That's what my mom and grandma always said!
 Next add your chocolate chips and cranberries. 
Guess what? It's time to get those babies into the oven!


No need to grease your pan...unless you want to. I never do for these cookies.
Form your cookies into little balls. Not too big or too small. About a large spoonful usually does it. You don't need to flatten your cookies, because they will flatten while in the oven. 
Now stick them in there (and be safe! The oven's hot!) and wait 12 minutes.
Time it right. These cookies are best if left for exactly 12 minutes!
 Weird I know, but I've got it down to a science. Trust me.


Alright it's been 12 mins now and you've just taken them out of the oven - safely, with oven mitts, I may add. At this point, your cookie will be very hot and extremely soft to the touch. There shouldn't be any signs of too much browning. They need a while to cool off, but before you leave them, decorate them with your cashews! I usually put a whole cashew on each cookie and when I have just bits and pieces I start getting creative. Okay now let them rest on the baking sheet for a while. 


It's 10 or 15 minutes later. Go check your cookies! They should be soft but a lot harder and easier to work with now. Carefully lift them from the sheet. You've got yourself an amazingly soft, melty cookie with the most flavour a cookie can possibly have. Seriously. They're so good.


I put mine into my vintage aqua Tupperware container, and I'm sure these will be devoured in the next few days. Not by me, sadly. I'm living the gluten free life lately, but my family can enjoy them!

Try out my cookies and let me know how it goes. Did you follow the recipe or did you try your own version? Experimenting in the kitchen is so much fun!
 Lots of love from my kitchen to yours

Marissa
CharmingShop